BushArts.com -"ScrapbookMax!"
ScrapbookMax! by Indigo Rose is a unique program designed specifically for digital scrapbookers, but with many extra features that cross over into Desktop and Multimedia publishing. So simple to use, ScrapbookMax! opens up a whole world of options to Crafty computer users, and is also a handy program for everyone else to have.
BushArts went looking for a decent program to assist with our print needs, and when discovering "Max", found a lot of bonus features that have made several other programs obsolete. It does far more than just layout a scrapbook page for printing.
Max is suitable for printing or arranging most of our existing published content (available freely around this site), and is very compatible with the other programs we support.
Max does have a free trial version to download.
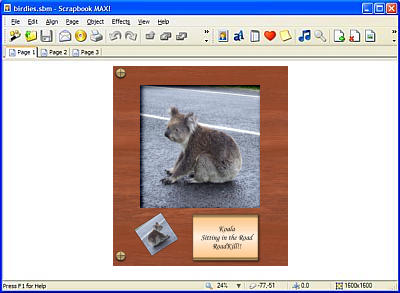
There is a massive community of support for Max, with an even larger supply of both free and commercial content constantly being made available. It also gets bonus points with us for the large amount of Aussies contributing to the Max forum community.
Below is the start of our contribution...
Our older stuff!
First off, there is plenty of free ScrapbookMax useable stuff around the rest of this site. Particularly if you have the graphics program "RealDrawPro" on your computer, but there is still a lot even if you don't.
Some examples...

...and lots more!
Templates - Blank
ScrapbookMax comes with many templates included in a variety of themes, but sooner or later you'll need to start a project from scratch. First thing to do when you get Max, is to create a starting template for yourself at your normal printer page size, or modify one of the existing to suit your own style.
As an example...
Sample Blank template for download (bamax022.zip 48Kb)
(Contains A4 paper sizes plus empty quarter fold Card layouts).
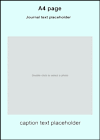
Next time you start Max, choose to "open an existing" instead of "New", and choose your own empty template as your starting file. Use "Save As..." with a different name once you have modified the empty version.
Templates - Decorated
The ScrapbookMax community will supply you with more examples and ideas than most could ever require!
To contribute, we needed to experiment with different methods, and came up with these couple of templates, using a few "unusual" techniques, which we have not yet seen used elsewhere.
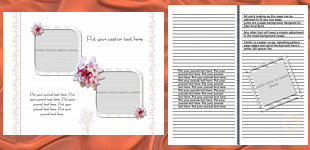
Modify to your hearts content!
Sample Floral Template for download (bamax044.zip 507Kb)
Sample Notebook Template for download (bamax045.zip 145Kb)
Embellishments
Something to give your pages a boost?
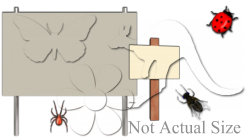
Any Clipart or graphic that you find, or already have on your computer, can be used within Max.
Sample pack of (something different!) Embies for download (baembies.zip 548Kb)
Paper scraps
Papers are an integral part of a scrapbook page, and Max already includes a variety for your use. But did you know that there are literally Millions of FREE papers available across the Internet? ...but not called "Papers"!
"Textures" is the term to use when searching, as this is what the repeating patterns get called in computer graphics. Larger ones are suitable for use as page backgrounds too.
There are even a couple of hundred free textures around this site, some are perfectly suited for use in Max! We've used some in the mini paper shapes below!
Sample pack of textures for download (batextures.zip 590Kb)
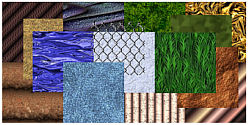
True paper scraps are made of "Seamless" patterns, and will not show any joins when you resize the placeholder for your scrap.
Shapes
These apply a mask over your images to create a different shape. You can easily make your own...
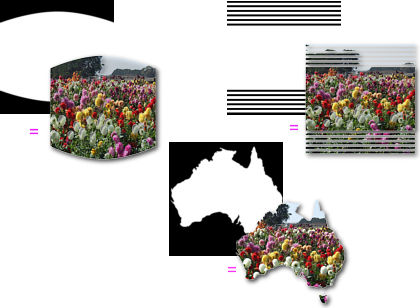
To make your own...
Use your favourite graphics program (any program), create a new image with a white background (preferrably at either 500x500 or 400x300 pixels, but not absolutely essential).
Create Black areas that will "knockout" the areas of your image that you want to disappear. (Or vice -versa, black background, new white areas to keep).
Save the new black and white image as a .png file into your Max shapes folder.
(Usually... C/Program files/ScrapbookMax/Gallery/Images/Shapes/)
Sample pack of 10 Shapes for download (bashapes.zip 141Kb)
Mini Paper Shapes
You can easily combine your paper scraps and shapes to create a new embellishment.
All you need is the shape applied to a paper scrap!
Again you can easily make your own, or grab a few of the examples below.
These use a much smaller shape image, (100x100 pixels), but will automatically resize to whatever you need.
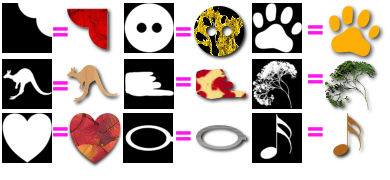
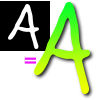
It is also one easy method of creating your own Alphabet!
Sample pack of 20 Mini Shapes for download (baminis.zip 46Kb)
These mini shapes are the fast and easy way to create your own items, without having a large memory impact on your computer. Use a larger shape for a full size image or photo.
Tips and Tricks
Max does not have to be used purely to create Scrapbooks! It doubles as a general purpose Desktop Publishing tool as well! You can use Max for all of your printing needs, with full control over where everything is positioned.
Max supplies lots of information on the Status Bar (Lower right of screen)...
![]()
Left to Right...
- Page Zoom
- Mouse Cursor Position
- Selected item Position
- Selected Item Size
All of these measurements are in pixels, (Picture Element), the standard for personal computers, and the measurement you need to "think" in when using a computer program like Max.
Many people set their Max project pages at 200dpi (dots per inch). That equates to 200 pixels per inch as well.
Example... A 400x400 pixel image at 200dpi would print at 2" x 2".
Example 2... An 8x8 inch project at 200dpi equals 1600 x 1600 pixels.
200dpi is not essential, 100dpi will work just as well on many projects, 300dpi may be better on others.
For all of us "Metrified" people, a per Inch setting has no relevance, and there is really no such thing as "pixel per centimetre" (ppc)! (1 inch equals 2.54cm), but Max does kindly allow you to use this setting. A 200dpi setting equates to 78.74 pixels per centimetre.
Too hard to work out? Change it to 100 pixels per centimetre (equals 254dpi). It will just give you a few more pixels to use on your page, and will be much easier to work out.
Metric Example... A 400x400 pixel image at 100ppc would print at 4cm x 4cm.
Metric Example 2... An A4 (Standard Paper size, portrait) project at 100ppc equals 2100 x 2970 pixels.
(page settings menu has Inch, Centimetre, or Pixel settings, and Max will do the math for you).
Having all of the pixel information on the status bar on screen will help with your positioning and sizing of every item you use in your projects, and will help you to understand what size (in pixels) to import your photos and embellishments.
Watch your Project folders...
Max will copy every image you use in your project, into your saved project folder, but does not remove this copy if you later decide it is not needed. Your project folders can quickly become bloated with unused files, if you do not keep an eye on them.
Backup your files...
When you save a project, Max creates a folder with the same project name under your /Documents/ScrapbookMax/Projects folder. In here is kept all of your project files. You may like to copy this project folder elsewhere as a backup.
Or... If you EXPORT the project as a TEMPLATE, (File Menu) and keep the photos included, Max will create an .smt version of your project in your /Documents/ScrapbookMax/Templates folder. All you then need to do to ensure you have a backup of your projects, is to keep a copy of that /Templates folder (preferrably not on the same Hard Drive).
A double click on any backup .smt file, will later on restore the project onto your system.
Saving smb files...
The ScrapbookMax site tells you to "open" an .smb file (packed with embies, shapes or papers) directly from the site. We would suggest not to.
Instead of "opening" the .smb, "Save" the .smb file first, directly onto a folder on your own system. Then you can double click it to install it straight into Max, but you will still have the .smb file to keep as a backup.
Watch the screen when you install these .smb files, There is a "details" tab on the " ...files were successfully added to ScrapbookMax... " screen. Click on the details tab to see where the embies, shapes or papers were installed to.
Importing images...
Max can use any image in any one of twelve computer formats. The very common .jpg, .bmp, .tif, .png, .gif, and Photoshops' .psd, or the less common .pcx, .tga, .wmf, .apm, .emf, .pcd formats.
Any image, in any of these formats, can be used within Max... and it can be used as a page background, photo, embellishment, paper scrap or all of the above!
There are some differences in how the image gets treated with each type of import category, (see chart below), but it does not matter what graphic format it is in, it can still be used in Max.
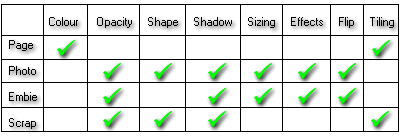
It also does not matter where it is kept on your computer, it can be in any folder, even if it is on an external portable drive it can still be used in Max. You do not have to have special folders to use an image in Max, (but you may like to keep things better organised by making up your own folders).
We would recommend that you size your images before importing. Max will keep a converted .png copy in your projects folder, but it will be at the original image size, not necessarily at the size you are using. Whilst this does allow you to enlarge the image in future modifications to your project, it does take up disk space and computer memory.
Making your own...
Max is not an image editor or creator, so you will need other programs to create things to use in Max. The most logical to have is a program that creates from scratch, programs like Adobe Photoshop or Elements, RealDrawPro, PaintShopPro, CorelDraw etc.

Learning how to use any of these programs well is the only difficult part, but any one of them is very capable of making quality items for use in Max.
There is also another way though...
Like Max, there is a huge community of support for users of 3D programs. These are programs that use computer generated models to create 3D objects, which can be manipulated and turned into Max compatible artwork. Plants, animals, furniture, buildings, jewellery... if you can think of the item, there will be a 3D model for you to play with. The learning curve with 3D is steep for a beginner, and the computer hardware requirements can be fairly heavy, but the results can be very, very spectacular.
Consider a free program like Daz Studio if you wish to get started in 3D.
Max Community
ScrapbookMax has an online community forum. Very well supported, this forum has a wealth of information on using Max, technical support, a huge gallery of examples, a sharing corner with more freebies than you'll ever need, and links to the ScrapbookMax Store.
Consider a visit to be compulsory!
Terms of use...
For downloads on this page...
As long as you are not redistributing the stuff we've made, we'll be happy however you use it in ScrapbookMax. You don't need to include any credits to us.